Thursday, November 7, 2013

College Football Nail Art Ft. my sister!

Hi all! Today I'm sharing with you a couple of looks that I've created in recent weeks, one for my homecoming at Rutgers University, and one for my sister as she goes to see her Terps at the University of Maryland.

Rutgers Manicure: The Lineup

Silver: Sephora Color Hit Nail Polish - "Bling Bling"
Red: Red Acrylic Paint - Americana Acrylic Paint in "Country Red"
Black: Black Acrylic Paint - brand unknown

First, I started off with 2 coats of Bling Bling on each nail. I then took a cuticle scissor (since the edges are quite sharp) and scratched up the tips of each nail (minus the thumb). Once I felt they were sufficiently "beaten up", I wiped black acrylic paint over them to fill in the gashes.

I then used striping tape and a small detailing brush to create the double stripes down the middle of each nail. I made the R logos as decals using the ziploc bag technique.


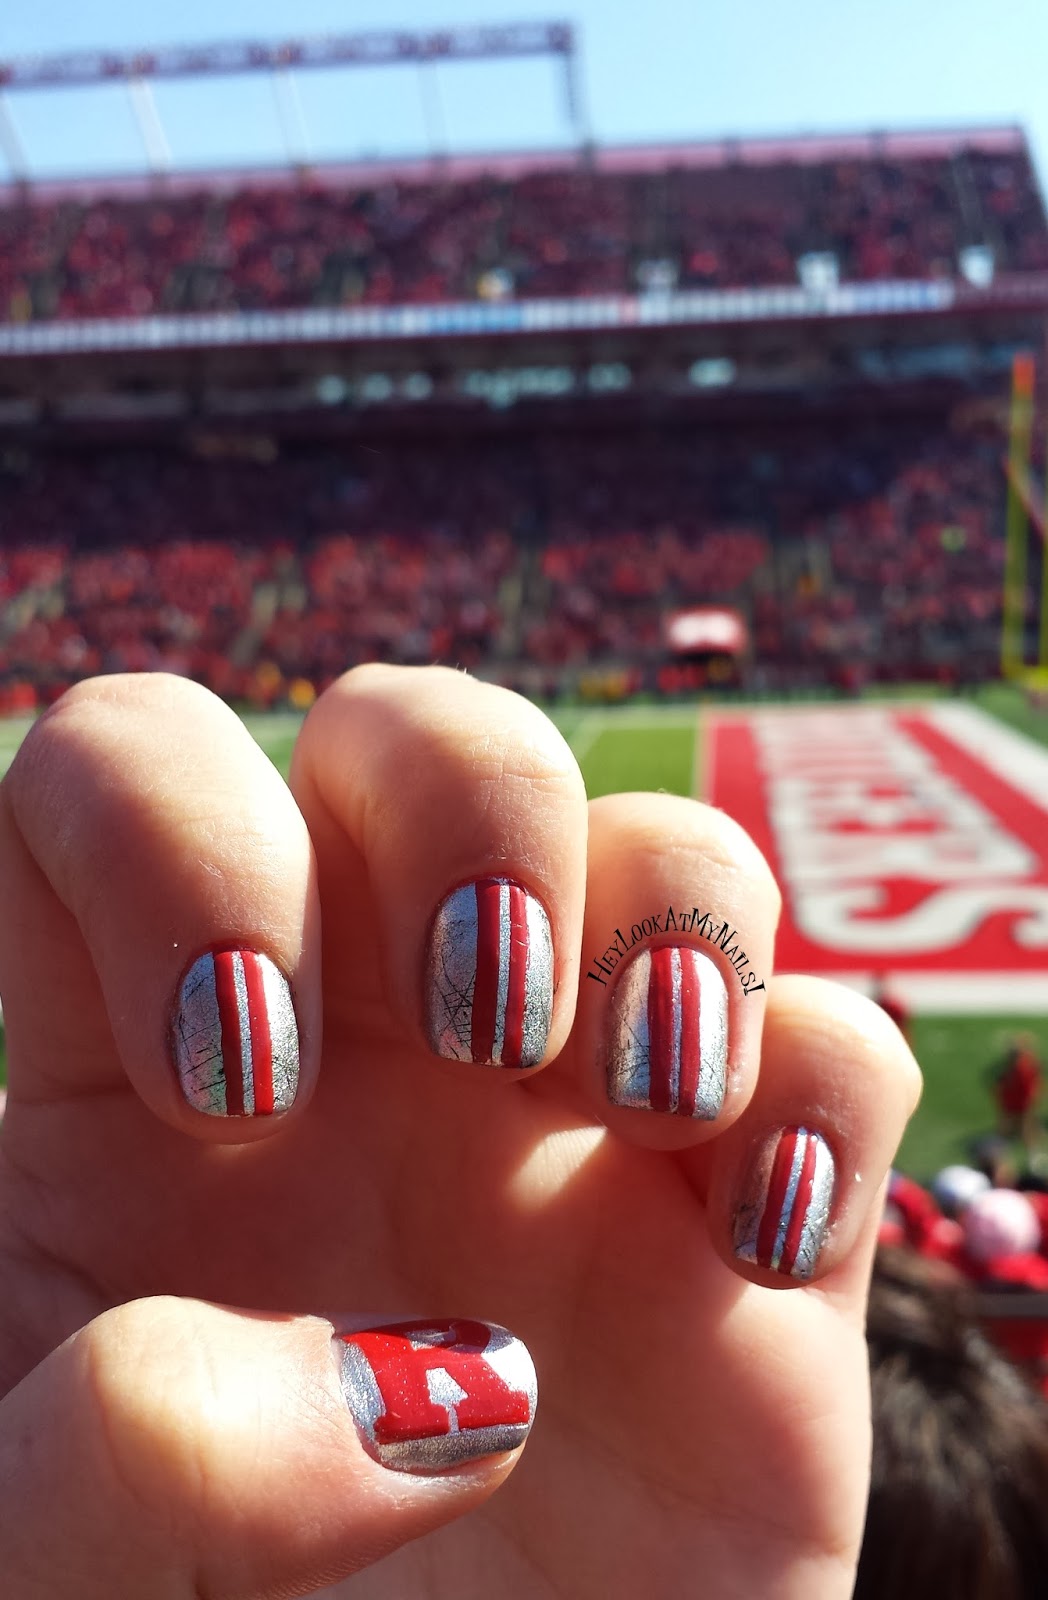
Ah, NOW the scratches make sense.


Maryland Manicure: The Lineup
Silk wraps, then OPI Gel Polish in "The Spy Who Loved Me" (Skyfall Collection 2012).

Decals are all Americana Acrylic Paints. Cadmium Yellow, Titanium White, Country Red, and Black.


My work in progress :)


The finished product: sorry for the lousy instagram photo :(

What do you think? Which teams should I do next?

Happy Polishing!
-Maggie

Thursday, October 24, 2013

Under the Sea with Revlon's "Wintermint" from the Parfumerie Collection!

Hi everyone! Thanks for being so patient with my posts - I've recently started yet ANOTHER job and so it's become increasingly harder to find time to share my nail lovin'!

By the way...THANK YOU SO MUCH for helping Hey Look At My Nails reach 10,000 pageviews!!!

I started this manicure off with a base of Revlon's "Wintermint" from the newly released Parfumerie collection. I'm totally sold on the gimmicky scented nail polish trend - especially when they look like this!

Let's just say Revlon seems to have taken a bit of inspiration from a certain $19-a-bottle polish company. Though they've definitely sweetened the deal (aside from the $4 price) by adding a yummy mint scent, plus these CUTE CUTE perfume-like bottles!!!
This was 3 coats I believe, with no topcoat.


After that, I decided to get a little more creative by adding a bit of a sponge gradient with OPI's "Tiffany Case" from their Bond Girl Liquid Sands collection. The round blue glitters in both polishes added a real nice, seamless gradient look to this style.


Finally, I used butterLONDON's "Knackered" to add nice little bubble accents coming up from the "depths"...I especially love the iridescence of Knackered, especially since it's typically used as an "oil slick" top coat. They've recently released something similar called "Petrol" , though it's deeper in color and doesn't feature the same micro-glitters as Knackered. And they both look super fab over black!

I hope you enjoy this manicure - sorry for the blurriness in some of the pictures, glitter is hard to capture!

Happy Polishing!
-Maggie

Saturday, October 12, 2013

Happy October! Opal Style Manicure

Almost at TEN THOUSAND VIEWS! Thank you all SO SO much for your support.

Okay...so I KNOW we're already halfway through October - but this is the manicure I chose to attempt in homage to October's birthstone, the Opal. There's also Tourmaline, but since that's not so easy to replicate, this is what I chose.

The Lineup:
Base: Revlon "Parfumerie" collection in "Fresh Linen" (Swatches and review of the collection coming soon!)
Accents: Ruby Wing "Eternal" and OPI "Sonic Bloom" - I sponged these on, and then blobbed on (technical term) a bit more of "Sonic Bloom"
Glitter - Essie "Shine of the Times"


Eh, didn't come out exactly how I wanted, but I still like the look. My topcoat caused some bubbles on a few nails :( I still love the iridescence of Sonic Bloom and Shine of the Times.

What do you think?

Happy Polishing!
-Maggie

Friday, October 11, 2013

New York Giants Nail Art

Yes yes yes I know the Giants are 0-6. Spare me the trash talk.

This is the manicure I wore to last Sunday's game vs. the birds.

The Lineup:
Base: Essie "Aruba Blue" (One of my absolute favorites and one of the only colors I'd need more than one bottle of"
Glitter: Wet N' Wild in "Kaleidoscope" - Super delicate and SUPER affordable ($0.89 at Harmon!)
Stripes: Americana Acrylic Paint in "Country Red" - with a striping brush
NY Logo: Americana Acrylic Paint in "Snow(Titanium)" - with a detailing brush
Football:
Base - OPI "Wooden Shoe Like To Know?:
Spots - Essie "Lady Godiva" w/ dotter tool
Laces: Random White nail art striper


Tailgating with Woodchuck Fall...yum
During the game - at least my nails looked nice!


Happy Polishing!
-Maggie

Thursday, October 10, 2013

Mariah Carey OPI Holiday 2013 Liquid Sands

So I just got an email from OPI that my last batch :( of Liquid Sands from the Liquid Sand Leading Lady contest will be shipping before the month is out!

Here's a sneak peek at what I'll be receiving and swatching for you!


Left to Right:
It’s Frosty Outside
This frosted silver is so icy it’s hot.
Emotions
This dramatic sparkling coal has got me feeling fine.
Kiss Me at Midnight
It’s time to fall in love with this frosted ice blue.
Silent Stars Go By
This blush of textured pink has parades of sparkle.
Baby Please Come Home
Can’t wait to see you…in this textured and sparkling lilac.
Make Him Mine
But make this textured glistening rose mine first!

Which one are you most excited about? I'm really loving It's Frosty Outside and Baby Please Come Home!

Happy Polishing!
-Maggie

Saturday, September 28, 2013

My first attempt at galaxy nails!

I would like to preface this with the fact that this is my first ever attempt at this nail art design.
It has been very popular in the past year, and many tutorials can be found both on Pinterest, as well as YouTube.
Left Hand, direct sunlight


The lineup:

Base - 2 coats Color Club "Blue-Topia"

Sponged on:
"OPI INK"
OPI "Alpine Snow"
Sephora "Shark Attack"
OPI "Austintatious Turquoise"
OPI "Need Sunglasses?"
OPI "Elephantastic Pink"

Glitters:
OPI "When Monkeys Fly" (**Minus the large gold glitters)
Color Club "Si Vous Please"

I started with 2 coats of the navy - it's a  nice dark almost-black color that gives this manicure a bit more character than black would. I then sponged on a bit of OPI Ink to give it a bit of dimension in some places. From there, I just went crazy with the sponging - most colors took a couple of coats since the background is so dark. I then used the glitters in the overall "direction" the white travelled on the nail to highlight stars.

Next time I do this manicure, I'll have to mess around with the color palette a bit more!

Left Hand, direct sunlight

Left Hand, indirect sunlight

Right Hand

Left Thumb

Right Thumb

I know around the nails is a bit messy - "Blue-Topia" is a bit runny (as are most navy blues) and I didn't think to clean up much after sponging. I hope you like them anyway!


Happy Polishing!
-Maggie

Monday, September 23, 2013

Happy Fall! New York Yankees Nail Art

Back in August, I bought the hubby tickets for his birthday for us to see the Yankees play the San Fran Giants at Yankee Stadium - knowing full well that they had announced it to be "Mariano Rivera Day". We're both avid Yankees fans, and so I couldn't wait to some up with something minimalistic but still distinct for the manicure for this game!

I did this the morning of, and it took about an hour trying to get the pinstripes as perfect as I could. The most challenging part (as you can imagine) was the interlocking N Y, which I did freehand. This only took about 15-20 minutes, but I had to go back over it multiple times to make it opaque, and then touch-up over it with the navy.


For this look I used "OPI...Eurso Euro" (2 coats), with OPI "Alpine Snow" as the base on the ring finger accent nail. I used butter LONDON "Dodgy Barnett" for the thumb accent, a subtle silver holo that looks gray in the shade. 

Had I been a bit more careful/had more time, those lines would have been perfect...ah well. I was trying out a new striping brush I had bought a few weeks back, I guess I just need more patience with it.

See? I promise I was there!
The sunlight makes Eurso Euro a tad more vibrant than it is in person, but it's still one of my favorite navys for fall...not greyed-out or toned down one bit, quite saturated. I'm also proud of my thumb...ask anyone, that interlocking NY free hand is hard to replicate!

Happy Polishing!
-Maggie

Wednesday, September 18, 2013

Shorter nails - Essie "Smokin' Hot" is perfect for fall!

Hey guys! I know, I know. I've been neglecting you all. I PROMISE I've got a bunch of ideas in the works for this blog, but my newly-started internship in Brooklyn has been taking up most (if not all) of my free time! That being said, I've finally set some time aside to post a short little snippet about my manicure and nail care since heading back into the (somewhat) corporate world!

First off, I've had to cut my nails. Typing with somewhat-long rounded nails was leading to just...issues with efficiency and speed. So, I decided to trim my nails down and go back to a straight across square. It's clean, even, and works well for most (if not all) finger/nail types. I would say however that IF you do to a lot of typing like me and have week or peeling nails, make sure you have a UV/LED gel foundation (like me!) otherwise you'll see your corners start to peel, break, etc. And then you'll have to reshape them into something rounded, or cut them :(.

This color by Essie "Smokin' Hot"is from their Winter 2010 collection (the collection that brought us fan favorites like "Hot Coco" and "Going Incognito": Its a glossy warm gray creme that is SUPER great for fall. When I applied it, I used 2 thick coats that dried in a decent amount of time. It's a neutral that's edgy but still falls under the spectrum of professional (at least modern professional) and can be worn day or night.


I then decided to take it to the next level (and disguise tip wear) with 2 coats of "When Monkey's Fly" from OPI's Oz The Great and Powerful Collection. Huge gold hex glitter mixed in with various sizes of holographic silver glitters...hard to apply, but fun when spread out appropriately. I topped it with 1 coat of Seche Vite (though you'll need more if you want to get it really smooth). Let's just say that removing this will be a pain in the buns.


Happy Polishing!
-Maggie

Friday, August 30, 2013

Color Club "Moody Blues" Mini Quad + A Glittery Jazzed Up Mani to send off summer!

Hey everyone! Today I picked up the Color Club "Moody Blues" Mini quad from Harmon ($6.99...what a bargain!) This quad includes mini bottles of 3 shades of blue and then a glitter topper:

Blue-Topia: A Dark "warm" almost black navy. When I say warm, I mean it has more green tendencies than purple for sure. This one was a 2 coater, and a really nice color for fall/winter. A lot darker than any other navy I own for sure. And there wasn't too much bleeding or staining upon cleanup and removal! This is without top coat too - look how glossy it finishes!


Take Me To Your Chateau: A pale sky blue cream that reminds me a lot of "Borrowed & Blue" By Essie - though I would say this is actually a bit more blue. Formula was a dream, 2 coats.


Hydrangea Kiss: A pale periwinkle-lavender creme jelly which is a dream to apply and has a finish like glass. The color reminds me a bit of "You're Such A Buda-Pest!" by OPI, though this is more blue and absolutely reminiscent of hydrangeas for sure. This is 2 coats without top coat.


Si Vous Please: A tiny round iridescent glitter in a milky base. Nothing special, though when I finally applied it I realized that I don't have an exact dupe for it. I chose to apply this over Hydrangea Kiss as a moon gradient. No top coat (yet)!


I then decided this wasn't quite "party" enough for Labor Day Weekend, so I added a couple of more glitter coats, including OPI's "Pink Yet Lavender" and "Polka.com" to jazz it up a bit!


I was a bit too lazy to clean up the glitter around the cuticles, but I really like the way this turned out! Which one from the quad is your favorite? How are you prepping your nails for the weekend?

Happy Labor Day, and Happy Polishing!
-Maggie

Thursday, August 29, 2013

Maybelline Color Show Vintage Leather Nail Lacquer - "Antique Teal"

Hi all! Today I'm swatching one of the polishes from Maybelline's Fashion Week Fall Collection, a color called "Antique Teal". The polishes in this collection are meant to have a "Vintage Leather" feel to them, which truly just means a matte finish with flakie glitter scattered throughout to break up the smoothness...umm...yeah.

This color is a dark dusty turquoise, a very "in" color for fall. The formula on this left a bit to be desired - it's tricky to work with since it's matte and dries rather quickly, but a second coat helped it gain opacity. I hate the un-evenness of matte polishes, though. And honestly, this flaky glitter business is really unnecessary too. I liked Nails Inc.'s version of leather effect polish better - it was a fine-grain sand texture in cream polish that dried to a dull shine...unlike this.


Then, I tried it with a top coat to see if that improved the look on it at all.  I just don't know if it's working for me.


I think this is a look more apt for shorter, more square nails. I truly love the color, but the flakies kind of ruin it for me. In person it's a tinge more green as well. What are your thoughts on it?

Happy Polishing!
-Maggie

Sunday, August 25, 2013

Sunday Funday - PGA Tour Barclays Golf Manicure

Good Morning everyone! As I write this post, my family and I are getting ready to head to Jersey City for the final round of the Barclays - and I thought the best way to celebrate was with, what else, a manicure!

This one took quite a bit of time - the thumb nails themselves were decals I had made earlier in the day using ziploc bags to trace the Barclays eagle on. The eagle itself is Essie's "In The Cab-Ana" followed by a layer of OPI's "Sonic Boom" and a bit of gradient of "Austin-tatious Turquoise" towards the bottom. I then applied it over 2 layers of Alpine Snow with another layer of Essie's Marshmallow, and sealed with top coat.


For my index fingers, I used In the Cab-ana once again to achieve a sky look, using Alpine Snow and Marshmallow to dot clouds on the tips. The blades of grass are a combination of Illamasqua's "Rampage" and Essie's "Pretty Edgy". I then proceeded to use Pretty Edgy for my ring fingers, as the color for the fairway, with "First Timer" for the green and "Sand Tropez" for the sand traps. The holes themselves are Essie "Licorice", with the flags being Alpine Snow and Essie's "Well Read".

Finally, the golf ball textured nails, although my favorite, were not easy to come by. I started out with 2 layers of Alpine Snow underneath a layer of Marshmallow, and soon realized it wasn't nearly enough polish to get the dented look I had been looking for. So I added another. And another. I think after maybe 4 coats of Marshmallow and with the help of some quick drying drops and a speed dry top coat, I was able to get it at just the right texture to be mold-able, but not sticky that it would drag and pull. I used the back end of a paint brush to dent my nails, as a dotting tool was too refined and would leave marks that were too small and basically just holes in my nails. It took repeated efforts to keep the polish from leveling itself out to finally get dents and not just dots/holes. I don't know how quick I'll be to repeat this look, but it was definitely worth the effort this time around!


If you have any more questions about how I got this look, leave a message in the comments below, or leave one on Facebook!

Happy Polishing!
-Maggie

Wednesday, August 21, 2013

butter LONDON "Wellies" nail art!

The other day I finally received "Wellies" from butter LONDON in the mail - They had originally mixed up my order and sent me another color. Wellies is a bright chatreuse cream, which needs no white base coat for it to POP! However, it does tend to stain so definitely use a good base coat underneath.

I decided to add some contrasting elements to this manicure, including some sponging of OPI's "I Juggle...Men" at the cuticles, as well as some dotting using Essie's "No More Film" And OPI's "OPI I.N.K.".


Happy Polishing!
-Maggie

Monday, August 19, 2013

Blue & Yellow Neon Gradient Manicure

This manicure uses only 2 colors - Essie's "In The Cab-ana" (CLEARLY a favorite for me this season) and Orly's "Glowstick". Starting off with a nice coat of OPI's "Alpine Snow" to give the colors some pop, I made it a bit easier on myself by keeping the index and ring fingers solid while sponging the blue/yellow combo on only 3 nails...keeping the colors aligned with their neighbors for a gradient effect.

To get the colors this opaque and blended, you really need to go over them a few times with the sponge, and make sure the polish isn't all soaked up by the sponge either! You don't want A. pieces of sponge coming off cuz it's sticking to your nail or B. no colors to show up at all - make sure you apply a real good coat of the polishes on the sponge each time you dab - and don't forget to clean up afterwards!


Happy Polishing!
-Maggie

Sunday, August 18, 2013

Water Color Nail Art

First thing's first - I've decided to try out the rounded tip look for a while. I've always been a square/squoval kinda gal but with the latest trends leaning toward a more rounded look I figured why not? Especially when I can keep them so well guarded with a couple coats of RCM's "Camera Shy" for a nude, polished gel look.

So having seen quite a few of these manis pop up on the interwebs, I figured I'd take a shot at a "water color" mani (NOT to be confused with water marbling or anything of that sort. This one actually doesn't use water at all, but gives the appearance of the translucent paints typically look.

I kept the RCM gel "Camera Shy" as my base since I like the cloudy nude look it gives, but most manis like this use white or another pastel shade. Basically, acetone is used to break down the integrity of the polish to give it a thinner look and formula. Chrissy Ai has a great tutorial on YouTube:


And here's my look, using Nicole by OPI's "Selena" (Selena Gomez Collection), China Glaze's "Mimosa's Before Mani's" **grammar NIGHTMARE** and my rosy salvage of Essie's "Ship Til I Drop"! Notice how I didn't necessarily get the polish all the way to the edges of the nail and/or left bald spots...It just adds to the style! Next time I think I'll try different/complementary colors instead of the keeping them all in the same family. What do you think?


Happy Polishing!
-Maggie

Friday, August 16, 2013

Teal with black & white chevron mani!

So I figured I'd jump on the chevron bandwagon before summer was out, and this was the look I came up with! Teal (which is very in for this season) plus a black & white chevron accent (freehand) and a bit of glitz on the middle finger. Base color is Ruby Wing's "Eternal", accent nail is Essie "Marshmallow" and "Licorice" (yum) and the fleck glitter on the middle nail is Essie's "Shine of The Times" stamped on for a more pressed-on look. Hope you like!


Note: "Shine of the Times" is a pain to get off skin - LOL.

Happy Polishing!
-Maggie

Friday, August 9, 2013

Random Nail Art Dump

First up is a design inspired by a patterned walled I had found while out shopping yesterday. The sponge ombre base is a combination of 3 Essie Polishes, "Haute as Hello", "In The Cab-Ana", and "Butler Please". I then use Enchanted Polish's "Djinn In A Bottle" before creating the tri-color cheetah print, in Essie's "Lady Godiva", OPI's "Wooden Shoe Like To Know", and Orly's "Passion Fruit". I then finished with a coat of Cult Nails Wicked Fast Speed Dry top coat. This took about 2 hours total, which I spend watching Harry Potter in the background ;).


This next look I simply wanted to do some straight even polka dots all within the same color family. The base is China Glaze's "For Audrey", with OPI "Alpine Snow" and butter LONDON "Slapper" for the dots. These dots came out much smaller and more concentrated than my pink on pink design, mainly since I got a new double-ended dotting tool. A.C. Moore for $1.29!


Lastly is a simple look inspired by an ILNP dark gray holo polish called "A.C. Slater" as inspired by the 90's show "Saved By The Bell". Sorry for the shaky cam look! This look was achieved by simply applying a layer of "Djinn In A Bottle" over Essie's "Power Clutch". I really love the way it pops!

Happy Polishing!
-Maggie

Wednesday, July 31, 2013

OPI Liquid Sand Lacquer matches!

Be advised - there are a lot of photos in this post! Having realized that my 2013 Liquid Sand collection is almost complete (There are 6 more coming out with the next holiday collection), I decided to have some fun with the ones I've got and do some matching manis with regular lacquers! Here's what I came up with:

Solitaire: Essie "Marshmallow"
Pussy Galore: Essie "French Affair"


The Impossible: Orly "Passion Fruit"
Magazine Cover Mouse: Essie "Rose Bowl"


Jinx: Essie "Cute As A Button"
Honey Ryder: OPI "Glitzerland"
What Wizardry Is This?: Essie "Sand Tropez"
 - Not a match, but complementary
Is All San Andreas's Fault: OPI "You Don't Know Jacques!"


Tiffany Case: Essie "In The Cab-ana"
Get Your Number: Essie "Mesmerize"

Wharf! Wharf! Wharf!: OPI "Dating A Royal"
Alcatraz...Rocks: Essie "No More Film"

Can't Let Go: OPI "Tomorrow Never Dies"
Vesper: Sally Hansen Complete Salon Manicure "Pat On The Black"

Stay The Night: Essie "Bahama Mama" and "Licorice"


So Which pairing is your favorite? I really like how the blues turned out, mainly "Tiffany Case". I also really like "Pussy Galore" as well as "It's All San Andreas's Fault".

Happy Polishing!
-Maggie